This blog post will walk you through setting up a Splunk environment on AWS for lab purposes using Splunk Enterprise Free 60-day trail. After 60 days you can convert to a perpetual free license or purchase a Splunk Enterprise license to continue using the expanded functionality designed for enterprise-scale deployments. There is an indexing limit of 500 MB/Day which will be more than enough for our demo purposes.
There are multiple ways to accomplish this - using AWS Console, CLI or using CloudFormation. For our demo purposes, we will be using Terraform by Hashicorp. Terraform is a tool for building, changing, and versioning infrastrcuture safely and efficiently.
This article assumes you have some familiarity with Terraform already.
All Terraform files are available to download at my GitHub Repo. You just need to edit the terraform.tfvars file and put your AWS ACCESS KEY ID and SECRET ACCESS KEY.
maven@pluto:~$ tree ./terraform/
./terraform/
├── cloudtrail.tf
├── module.tf
├── output.tf
├── provider.tf
├── splunk
│   ├── instance_splunk.tf
│   ├── splunk_iam_role.tf
│   ├── splunk_iam_role_pol.json
│   ├── user_data_splunk.sh
│   ├── variables.tf
│   └── vpc_splunk.tf
├── sqs_cloudtrail_logs.tf
├── terraform.tfvars
├── variables.tf
└── versions.tf
1. Create an IAM Role for the Splunk Instance and attach a policy which allows EC2 instances to call AWS services on your behalf.
resource "aws_iam_role" "splunk_iam_role" {
  name = "splunk_role"

  assume_role_policy = <<EOF
{
  "Version": "2012-10-17",
  "Statement": [
    {
      "Action": "sts:AssumeRole",
      "Principal": {
        "Service": "ec2.amazonaws.com"
      },
      "Effect": "Allow",
      "Sid": ""
    }
  ]
}
EOF
}

output "splunk_iam_role_arn" {
  description = "The ARN of the Role"
  value       = aws_iam_role.splunk_iam_role.arn
}
2. Create an IAM Policy and attach to the Splunk IAM Role with all the required permissions to pull logs from required AWS services.
resource "aws_iam_role_policy" "splunk_iam_policy" {
  name = "splunk_policy"
  role = aws_iam_role.splunk_iam_role.id

  policy = file("${path.module}/splunk_iam_role_pol.json")
}
Example IAM policy which will cover the majority of access splunk should need within AWS. Policy containing permisisons for all inputs is available at Splunk Docs
{
  "Version": "2012-10-17",
  "Statement": [
    {
      "Effect": "Allow",
      "Action": [
        "sqs:GetQueueAttributes",
        "sqs:ListQueues",
        "sqs:ReceiveMessage",
        "sqs:GetQueueUrl",
        "sqs:SendMessage",
        "sqs:DeleteMessage",
        "s3:ListBucket",
        "s3:GetObject",
        "s3:GetBucketLocation",
        "s3:ListAllMyBuckets",
        "s3:GetBucketTagging",
        "s3:GetAccelerateConfiguration",
        "s3:GetBucketLogging",
        "s3:GetLifecycleConfiguration",
        "s3:GetBucketCORS",
        "config:DeliverConfigSnapshot",
        "config:DescribeConfigRules",
        "config:DescribeConfigRuleEvaluationStatus",
        "config:GetComplianceDetailsByConfigRule",
        "config:GetComplianceSummaryByConfigRule",
        "iam:GetUser",
        "iam:ListUsers",
        "iam:GetAccountPasswordPolicy",
        "iam:ListAccessKeys",
        "iam:GetAccessKeyLastUsed",
        "autoscaling:Describe*",
        "cloudwatch:Describe*",
        "cloudwatch:Get*",
        "cloudwatch:List*",
        "sns:Get*",
        "sns:List*",
        "sns:Publish",
        "logs:DescribeLogGroups",
        "logs:DescribeLogStreams",
        "logs:GetLogEvents",
        "ec2:DescribeInstances",
        "ec2:DescribeReservedInstances",
        "ec2:DescribeSnapshots",
        "ec2:DescribeRegions",
        "ec2:DescribeKeyPairs",
        "ec2:DescribeNetworkAcls",
        "ec2:DescribeSecurityGroups",
        "ec2:DescribeSubnets",
        "ec2:DescribeVolumes",
        "ec2:DescribeVpcs",
        "ec2:DescribeImages",
        "ec2:DescribeAddresses",
        "lambda:ListFunctions",
        "rds:DescribeDBInstances",
        "cloudfront:ListDistributions",
        "elasticloadbalancing:DescribeLoadBalancers",
        "elasticloadbalancing:DescribeInstanceHealth",
        "elasticloadbalancing:DescribeTags",
        "elasticloadbalancing:DescribeTargetGroups",
        "elasticloadbalancing:DescribeTargetHealth",
        "elasticloadbalancing:DescribeListeners",
        "inspector:Describe*",
        "inspector:List*",
        "kinesis:Get*",
        "kinesis:DescribeStream",
        "kinesis:ListStreams",
        "kms:Decrypt",
        "sts:AssumeRole"
      ],
      "Resource": [
        "*"
      ]
    }
  ]
}
3. Create an IAM instance profile for Splunk Instance.
resource "aws_iam_instance_profile" "splunk_instance_profile" {
  name = "splunk_instance_profile"
  role = aws_iam_role.splunk_iam_role.name
}

output "splunk_instance_profile_name" {
  description = "The instance profile's name"
  value       = aws_iam_instance_profile.splunk_instance_profile.name
}
4. Create a CloudTrail for your AWS Account.
You can create up to five trails for each region. After you create a trail, CloudTrail automatically starts logging API calls and related events in your account to the Amazon S3 bucket that you specify. To stop logging, you can turn off logging for the trail or delete it.
resource "aws_cloudtrail" "lab_trail" {
  name                          = "lab_trail"
  s3_bucket_name                = aws_s3_bucket.trail_bucket.id
  include_global_service_events = false
  is_multi_region_trail         = false
}

output "lab_trail_id" {
  description = "The name of the trail"
  value       = aws_cloudtrail.lab_trail.id
}

output "lab_trail_region" {
  description = "The region in which the trail was created"
  value       = aws_cloudtrail.lab_trail.home_region
}
5. Create an Amazon S3 bucket for our CloudTrail.
resource "aws_s3_bucket" "trail_bucket" {
  bucket        = "${data.aws_caller_identity.current.account_id}-lab-cloudtrail-logs"
  force_destroy = true

  policy = <<POLICY
{
    "Version": "2012-10-17",
    "Statement": [
        {
            "Sid": "AWSbucketAclCheck",
            "Effect": "Allow",
            "Principal": {
              "Service": "cloudtrail.amazonaws.com"
            },
            "Action": "s3:GetBucketAcl",
            "Resource": "arn:aws:s3:::${data.aws_caller_identity.current.account_id}-lab-cloudtrail-logs"
        },
        {
            "Sid": "AWSbucketWrite",
            "Effect": "Allow",
            "Principal": {
              "Service": "cloudtrail.amazonaws.com"
            },
            "Action": "s3:PutObject",
            "Resource": "arn:aws:s3:::${data.aws_caller_identity.current.account_id}-lab-cloudtrail-logs/AWSLogs/${data.aws_caller_identity.current.account_id}/*",
            "Condition": {
                "StringEquals": {
                    "s3:x-amz-acl": "bucket-owner-full-control"
                }
            }
        }
    ]
}
POLICY
}

output "trail_bucket_id" {
  description = "The name of the bucket"
  value       = aws_s3_bucket.trail_bucket.id
}

output "trail_bucket_region" {
  description = "The ARN of the bucket"
  value       = aws_s3_bucket.trail_bucket.arn
}
6. Create two SQS Queues.
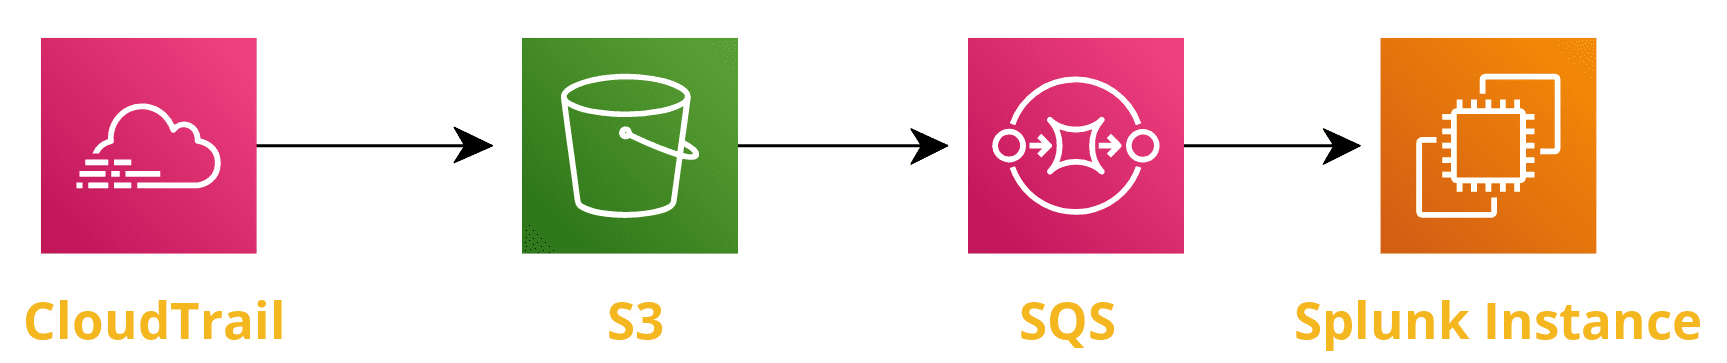
Now it’s time to create the SQS queues. Two queues will be required. One queue will be the dead letter queue for error messages to be kicked over to and the other will be the queue used to capture the S3 notifications when a new Cloud trail event is sent to the S3 bucket we created in earlier step.
# Add Amazon S3 Event Notification configuration to SQS Queue
resource "aws_sqs_queue" "queue" {
  name                       = "s3_event_notification_queue"
  visibility_timeout_seconds = 300
  redrive_policy = jsonencode({
    deadLetterTargetArn = aws_sqs_queue.dl_queue.arn
    maxReceiveCount     = 1
  })

  policy = <<POLICY
{
  "Version": "2012-10-17",
  "Statement": [
    {
      "Effect": "Allow",
      "Principal": "*",
      "Action": "sqs:SendMessage",
      "Resource": "arn:aws:sqs:*:*:s3_event_notification_queue",
      "Condition": {
        "ArnEquals": { "aws:SourceArn": "${aws_s3_bucket.trail_bucket.arn}" }
      }
    }
  ]
}
POLICY
}

# Set up a dead-letter queue for the SQS queue to be used for the input for storing invalid messages
resource "aws_sqs_queue" "dl_queue" {
  name = "dl_queue_error_messages"
}

resource "aws_s3_bucket_notification" "bucket_notification" {
  bucket = aws_s3_bucket.trail_bucket.id

  queue {
    queue_arn = aws_sqs_queue.queue.arn
    events    = ["s3:ObjectCreated:*"]
  }
}

output "sqs_arn" {
  description = "The ARN of the SQS queue"
  value       = aws_sqs_queue.queue.arn
}
7. Create an Amazon VPC for our Splunk Splunk Instance
Please note this step is not mandatory, you can use the default VPC as well. In this step we will demonstate how to setup our own VPC, a public subnet, an Internet Gateway along with a route table.
# VPC
resource "aws_vpc" "splunk_vpc" {
  cidr_block = "192.168.0.0/24"
  enable_dns_hostnames = "true"
  instance_tenancy = "default"

  tags = {
    Name = "splunk_vpc"
  }
}

output "splunk_vpc_arn" {
  description = "The ARN of the VPC"
  value       = aws_vpc.splunk_vpc.arn
}

output "splunk_vpc_id" {
  description = "The ID of the VPC"
  value       = aws_vpc.splunk_vpc.id
}

# Public Subnet
resource "aws_subnet" "splunk_subnet_public" {
  vpc_id                  = aws_vpc.splunk_vpc.id
  cidr_block              = "192.168.0.0/24"
  map_public_ip_on_launch = "true"
  availability_zone    = "us-east-1a"

  tags = {
    Name = "splunk_subnet_public"
  }
}

output "splunk_subnet_public" {
  description = "The ID of the public subnet"
  value       = aws_subnet.splunk_subnet_public.id
}

# Internet GW
resource "aws_internet_gateway" "splunk_gw" {
  vpc_id = aws_vpc.splunk_vpc.id

  tags = {
    Name = "splunk_gw"
  }
}

output "splunk_gw" {
  description = "The ID of the IGW"
  value       = aws_internet_gateway.splunk_gw.id
}

# Route Table
resource "aws_route_table" "splunk_route_table" {
  vpc_id = aws_vpc.splunk_vpc.id

  route {
    cidr_block = "0.0.0.0/0"
    gateway_id = aws_internet_gateway.splunk_gw.id
  }

  tags = {
    Name = "splunk_route_table"
  }
}

output "splunk_route_table" {
  description = "The ID of the routing table"
  value       = aws_route_table.splunk_route_table.id
}

# Associate Route Table and Subnet
resource "aws_route_table_association" "splunk_route_table_subnet_public" {
  subnet_id      = aws_subnet.splunk_subnet_public.id
  route_table_id = aws_route_table.splunk_route_table.id
}
8. Create an EC2 Instance of the latest Ubuntu 18.04 on a t2.medium node.
Now, let’s create an instance where we will use the user_data argument to pass our bash script which will download
and install Splunk Enterprise for us.
data "aws_ami" "ubuntu_server" {
  most_recent = true
  owners = ["099720109477"] # Canonical

  filter {
    name = "name"
    values = ["ubuntu/images/hvm-ssd/ubuntu-bionic-18.04-amd64-server-*"]
  }

  filter {
    name = "virtualization-type"
    values = ["hvm"]
  }
}

resource "aws_instance" "splunk_instance" {
   ami = data.aws_ami.ubuntu_server.id
   iam_instance_profile = aws_iam_instance_profile.splunk_instance_profile.name
   instance_type = "t2.medium"
   key_name = "lab_kp"

   # VPC
   subnet_id = aws_subnet.splunk_subnet_public.id

   # SG
   vpc_security_group_ids = [aws_security_group.splunk_sg.id]
   root_block_device {
     volume_type = "gp2"
     volume_size = 16
   }
   user_data = file("${path.module}/user_data_splunk.sh")

   tags = {
     Name = "splunk"
   }
 }

 output "splunk_instance_id" {
  description = "Instance ID"
  value       = aws_instance.splunk_instance.id
}

 output "splunk_instance_public_ip" {
  description = "Public IP"
  value       = aws_instance.splunk_instance.public_ip
}

 output "splunk_instance_private_ip" {
  description = "Private IP"
  value       = aws_instance.splunk_instance.private_ip
}

# SG
resource "aws_security_group" "splunk_sg" {
  description = "Allow SSH inbound traffic"
  vpc_id      = aws_vpc.splunk_vpc.id

  ingress {
    description = "Splunk Port 8000 from Home Netowrk"
    from_port   = 8000
    to_port     = 8000
    protocol    = "tcp"
    cidr_blocks = ["${var.home_ip}/32"]
  }

  ingress {
    description = "SSH from Home Netowrk"
    from_port   = 22
    to_port     = 22
    protocol    = "tcp"
    cidr_blocks = ["${var.home_ip}/32"]
  }

  egress {
    from_port   = 0
    to_port     = 0
    protocol    = "-1"
    cidr_blocks = ["0.0.0.0/0"]
  }

  tags = {
    Name = "splunk_sg"
  }
}

output "splunk_sg" {
  description = "The ID of the security group"
  value       = aws_security_group.splunk_sg.id
}
User Data: When you install Splunk Enterprise, you must create a username and password for your administrator account. We will create admin credentials using the --gen-and-print-passwd CLI arguments.
#! /bin/bash -xe
exec > >(tee /var/log/user-data.log|logger -t user-data -s 2>/dev/console) 2>&1
echo BEGIN
sudo apt-get update
sudo apt-get upgrade -y
cd /tmp && wget -O splunk-8.0.3-a6754d8441bf-linux-2.6-amd64.deb
'https://www.splunk.com/bin/splunk/DownloadActivityServlet?architecture=x86_64&platform=linux&version=8.0.3&product=splunk&filename=splunk-8.0.3-a6754d8441bf-linux-2.6-amd64.deb&wget=true'
cd /opt
sudo dpkg -i /tmp/splunk-8.0.3-a6754d8441bf-linux-2.6-amd64.deb
cd splunk/
/opt/splunk/bin/splunk start --accept-license --answer-yes --no-prompt --gen-and-print-passwd
echo END
9. Login to Splunk Instance using the public IP of the EC2 instance
Browse to http://public_ip:8000
username: admin
password: You need to grab from the file /var/log/user-data.log
It will be randomly generated as we used the option --gen-and-print-passwd
10. Install these two apps on the Splunk Instance.
Once the apps are installed, restart Splunk.
11. Go to App: Splunk Add-on for AWS and go under the “Configuration” tab, you’ll see Role Assigned to the Splunk instance will populate in a couple of seconds.

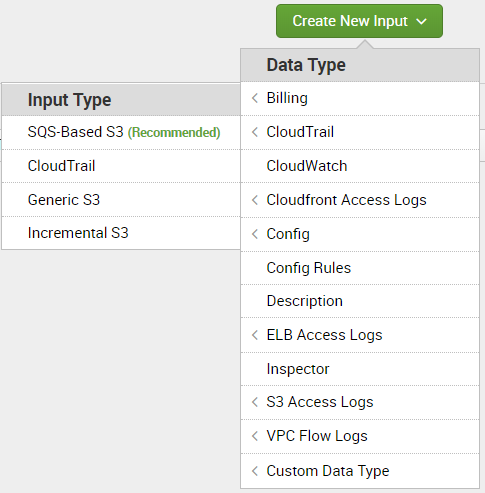
12. Go to “Inputs” tab
Create a New Input selectng Data Type CloudTrail and Input Type SQS-Based S3
13. Fill out the AWS Input Configuration details
- Please note under the AWS Account, name of the role assigned to the Instance will automatically show up.
- For the SQS Queue Name, you will see two SQS queues we created in earlier post. Please select the Event Notification Queue.
- For the Index, either you can create a new index for CloudTrail logs or using existing one.

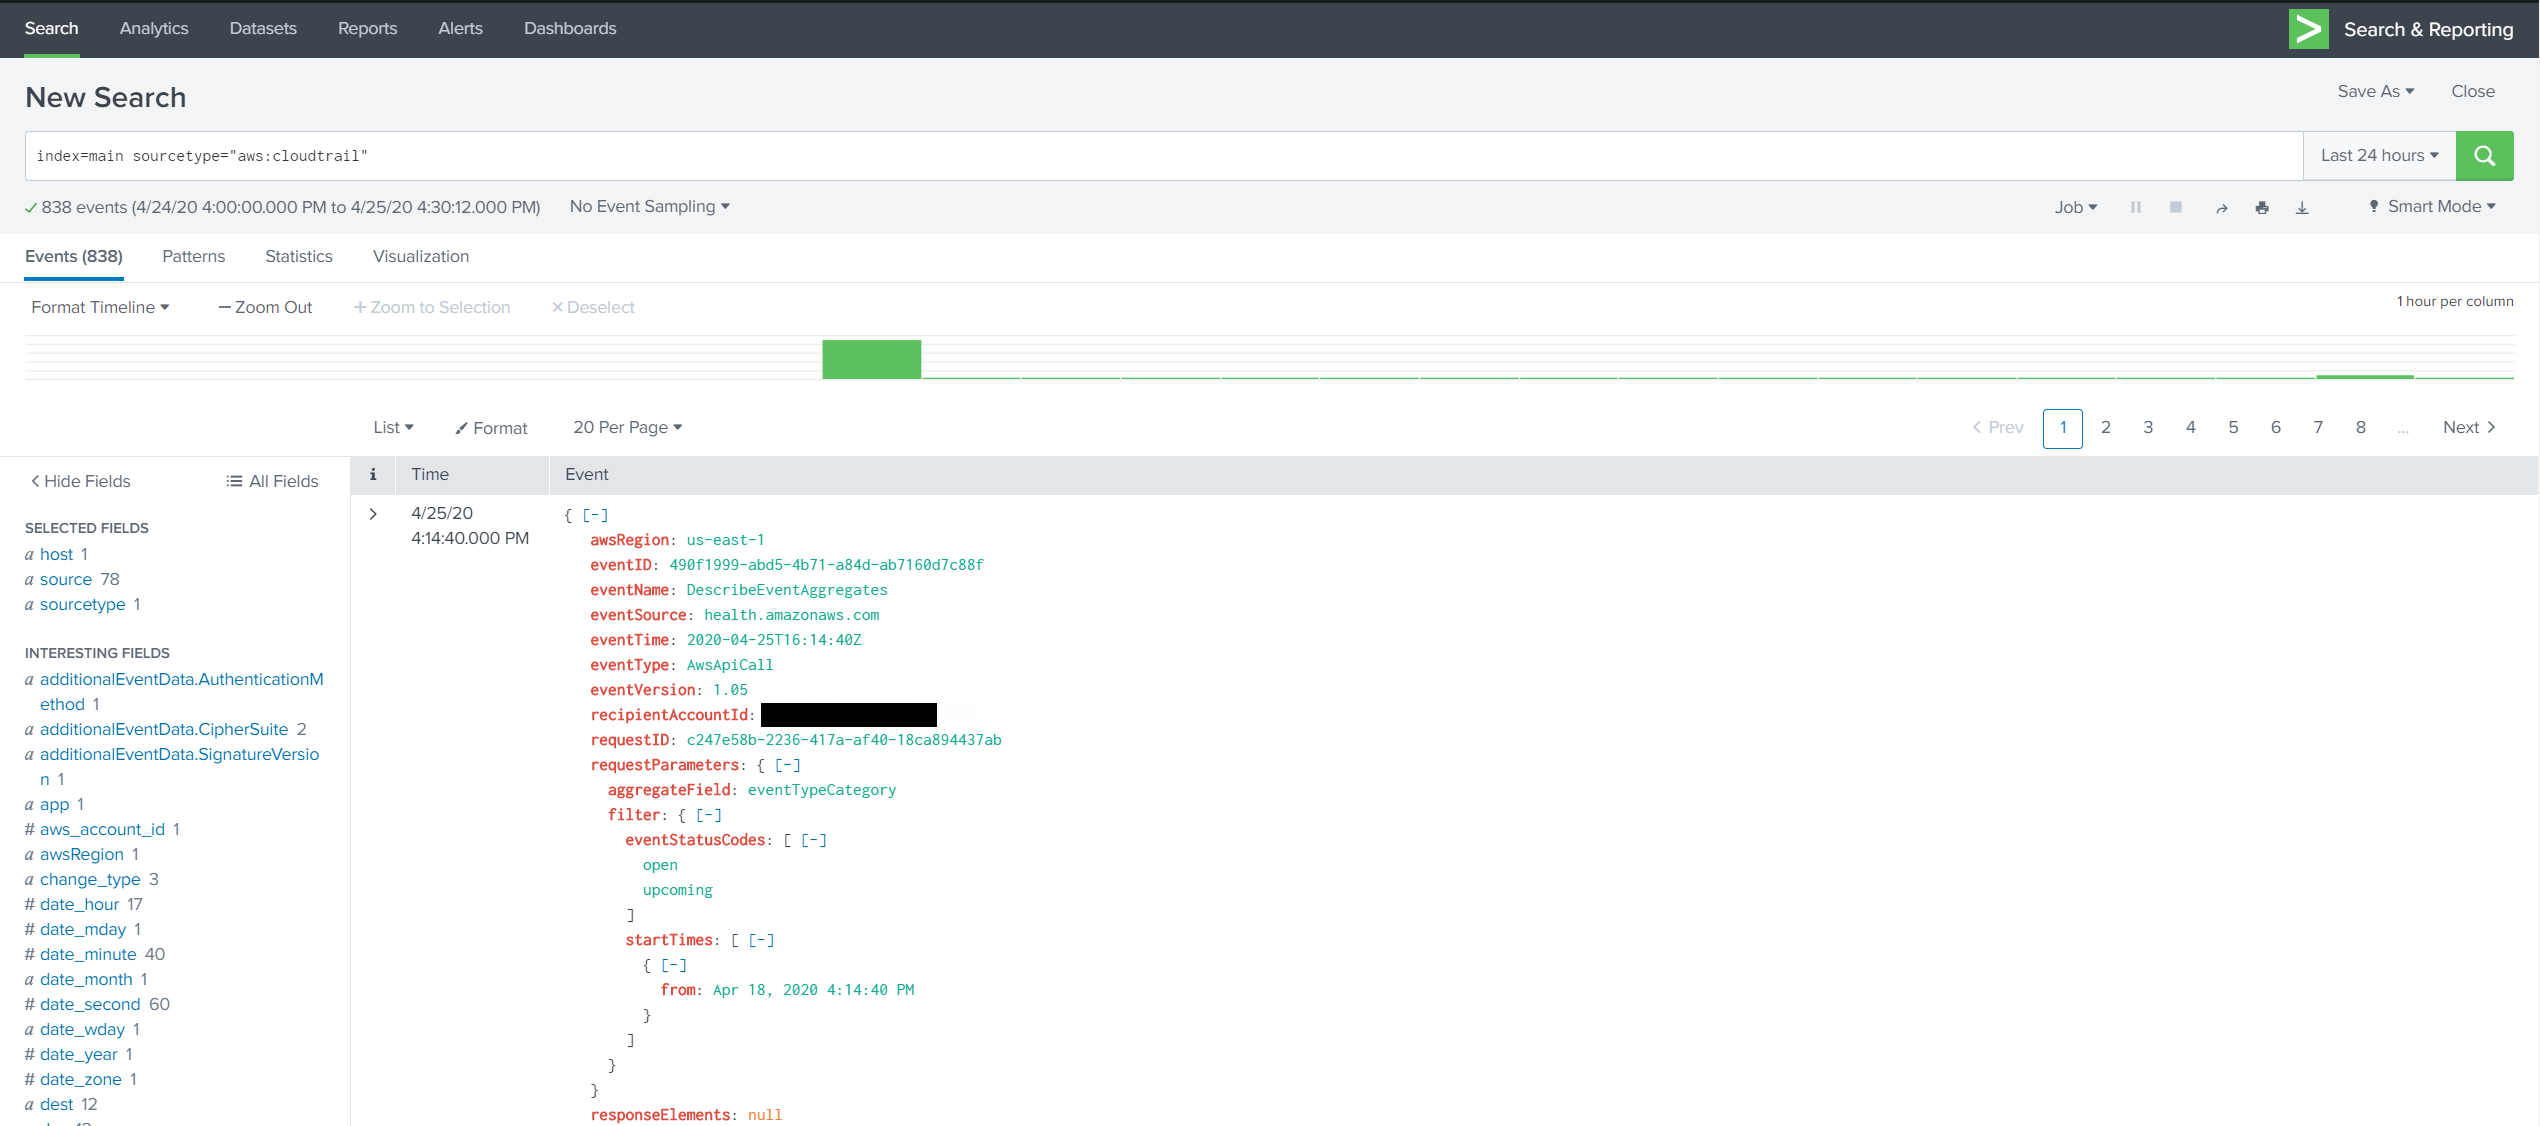
14. Go to Search & Reporting App
Search for the CloudTrail logs using the SPL:
index=main sourcetype="aws:cloudtrail"
| table _time eventSource eventName eventType errorCode awsRegion userIdentity.accountId
Summary: In this post, we learnt how to setup up a Splunk environment on AWS for lab purposes. We used Terraform to setup the AWS environment and then manually configured Splunk to integrate the CloudTrail logs.